As you may have seen, I moved away my blog from BlogSpot to a self hosted WordPress blog. The main objective was to use my own domain http://www.leonardofischer.com, as well as to have more freedom to customize the blog. And as the old BlogSpot template doesn’t work with WordPress, I needed to choose a new template…
No, I was kidding. I could choose a template made by anyone, but I opted to create one by myself. And that was what I did, a WordPress template. This one you is looking at right now.
I still believe that I’m not a good web-designer, but making this theme was a very good exercise: I need to deal with HTML, CSS, and the WordPress API. I am even thinking about writing my own WordPress Theming Introduction Guide, but I will think about that latter.
I am happy that I could make this theme work, without making it look like $#@%. I added some options to it out of the box, like Google Analytics support and a option to disable the automatic insertion of <p> and <br> tags (I could not find a way to do this on BlogSpot, and WordPress allows it only by hacking the theme you are using). In the theme I’m writing these options could be edited without touching any code: there is a menu for that after enabling this theme. ツ
I am still working on this theme. Particularly, I want to use a responsive design approach to it and add support to widgets (I want to add a “Friends links” area to the sidebar). And maybe a customized 404 page…
I’m not sure why anyone may want, but I released the source code of this theme on GitHub. If you want, download, modify and use it as you wish. And fell free to add any comments, suggestions or bugs you found in the comment section bellow.
A few weeks ago, I needed to implement a service. Or a daemon. Or whatever you call a process that you start, and it runs in background until you call it to stop. I found the Java Service Wrapper, but I didn’t like it: it has several OS dependent distributions, and a documentation that you take some time to learn. Other options include some forums recommending some scripts that depend on the operating system that allows you to run a java application in background. No one seems as easy as I thought that it could be.
So I decided to take the joy of writing my own service wrapper. I called it Java Simple Services. I focused on making it simple, small and only dependent on the JDK. The result is a small set of classes that manages the service for the user, making it relatively easy to start a background process. First, I’ll present how to use it. If you’re interested on how it works, just keep reading.
The Clock Application Example
I like the ‘learn by example’ approach, so I will present a very simple clock application. When started, it will run “forever”, or until you give it a signal to stop. At each loop, it will update the last time read. You can think of it as a much more complex process, such as a web server or a database system that should run in background mode. It will serve as an example for the service that I will build using Java Simple Services.
package com.leonardofischer.jss.test;
import java.util.Date;
public class ClockApp {
    public boolean keepRunning = true;
    public String date = "Not executed yet";
    public void run() {
        try {
            while (keepRunning) {
                date = (new Date()).toString();
                System.out.println(date);
                Thread.sleep(1000);
            }
        }
        catch (InterruptedException e) {
            e.printStackTrace();
        }
    }
    public static void main(String[] args) {
        ClockApp clock = new ClockApp();
        clock.run();
    }
}
The Service Class: Creating the Clock Service
I tried to build an API as simple as possible to create services. After some work, I got an API design that requires you to implement only one abstract class and that is it.
In the Java Simple Services, you need to extend the Service class. Although it has several methods you can override, you only need to know three methods: start(String args[]), stop(String args[]) and parseArgs(String args[]). You can think this way:
The start(String args[]) method is the main(String args[]) method of your service. You will put your code here, and you should return from it only after you processing is done or your service must stop;
The stop(String args[]) method is where you put the code to stop your application. Although it can take as long as you need, you should use this method to only send a signal to your code in the start(String args[]) method to make it stop running, and then return. Note that this method will be executed in a different thread from the one where start(String args[]) is running, so you may need some synchronization here;
Finally, the parseArgs(String args[]) will take your command line arguments and will start, stop and do other things with your service.
So, here is the code to wrap our clock application in a service:
package com.leonardofischer.jss.test;
import com.leonardofischer.jss.Service;
public class ClockService extends Service {
    ClockApp clock;
    public void start(String[] args) {
        clock = new ClockApp();
        clock.run();
    }

    public void stop(String[] args) {
        clock.keepRunning = false;
    }

    public static void main(String[] args) {
        ClockService clockService = new ClockService();
        clockService.parseArgs(args);
    }
}
Using Java Simple Services and the code above, you have an application that runs in background, can be started, and stopped and so on… Let’s run it:
$> java com.leonardofischer.jss.test.ClockService
Usage: java com.leonardofischer.jss.test.ClockService {start|stop|restart|sta
tus}
$> java com.leonardofischer.jss.test.ClockService start
The service started
$> java com.leonardofischer.jss.test.ClockService start
The service is already running, or another process is using the port 6400.
$> java com.leonardofischer.jss.test.ClockService status
STATUS: the service is running
$> java com.leonardofischer.jss.test.ClockService restart
The service stoped
The service started
$> java com.leonardofischer.jss.test.ClockService status
STATUS: the service is running
$> java com.leonardofischer.jss.test.ClockService stop
The service stoped
$> java com.leonardofischer.jss.test.ClockService stop
The service is not running
$>
As you can see, it is very easy to execute, get status and stop the ClockApp in a background process. The commands above are already built into JSS, so all the code you needed was the new ClockService class. But how you can change those generic default messages? How to return the current time using the status command? All that can be changed using service configuration.
Service Customization
The code above may be too simple for what you need, so I developed several methods in the service class that, if you override, should allow you to customize your service. I’ll present some methods, but please give a look at the class Documentation, so you can know exactly what you can do here.
public class ClockService extends Service {
    // same code as above, plus these methods
    public String status(String[] args) {
        return clock.date;
    }
    public void onServiceNotRunning() {
        printErrorMessage("The ClockService is not running, "+
                "please start it with the 'iniciar' command");
    }
    // new version of the main, with some customization
    public static void main(String[] args) {
        ClockService clockService = new ClockService();
        // 'iniciar' is the portuguese word for 'start'
        clockService.setStartCommand("iniciar");
        // Go to 'How Java Simple Services Work' if you want to know
        // why setting a port here
        clockService.getServiceController().setPort(9876);
        clockService.parseArgs(args);
    }
}
And if we run again those commands…
$> java com.leonardofischer.jss.test.ClockService
Usage: java com.leonardofischer.jss.test.ClockService {iniciar|stop|restart|s
tatus}
$> java com.leonardofischer.jss.test.ClockService start
Usage: java com.leonardofischer.jss.test.ClockService {iniciar|stop|restart|s
tatus}
$> java com.leonardofischer.jss.test.ClockService iniciar
The service started
$> java com.leonardofischer.jss.test.ClockService iniciar
The service is already running, or another process is using the port 9876.
$> java com.leonardofischer.jss.test.ClockService status
Wed Jul 11 21:53:51 BRT 2012
$> java com.leonardofischer.jss.test.ClockService restart
The service stoped
The service started
$> java com.leonardofischer.jss.test.ClockService status
Wed Jul 11 21:54:19 BRT 2012
$> java com.leonardofischer.jss.test.ClockService stop
The service stoped
$> java com.leonardofischer.jss.test.ClockService stop
The ClockService is not running, please start it with the 'iniciar' command
$>
I did not use here all the possible customization. I only wanted to show you some examples, such as returning the last read time with the status command, changing the command string used to start the service and change the error message if the service is not running.
Also, there is a ServiceController class that helps on the service execution. There are some customization points here too, but they are more related to the process that will be executed in background. Read carefully the documentation before use these methods, ok?
How Java Simple Services Work
This is the advanced topic on Java Simple Services, so not everyone needs to read from now on to use it. But I invite you to continue reading.
First of all, your service will run in a different process than the one that you executed it with the start command line parameter. If you use the ‘run’ parameter, then it will run in this process, but with start, another process will be started with the ‘run’ parameter, and the process that you started will finish normally. The configuration of the ServiceController class serves to customize how the JVM will be executed here.
When you execute the run parameter, the ServiceController also creates a thread that listens for future commands. It uses the Java Socket API, and that is why you can set a port to listen to. This socket will be opened until you return from your start(String args[]) method. Note that this thread will be blocked by the socket waiting for a connection, so it will not take any processor time until you try to connect to the service.
If you run a command such as stop, status or restart, the process that executes this command will connect to the service through the socket. Thus, you need to use the same port that you used to run your service, or you will not be able to connect to it. When the running server receives a command through the socket, it understands it (as well as the command line parameters from the command line) and calls the corresponding service method.
That’s it!
That’s all folks. I hope that Java Simple Services can be as helpful to you as it was for me. I am releasing the full source code, and I invite you to submit any bug fix or feature that you developed for it. Or just leave a comment with your thoughts about it.
No, this isn’t another tutorial on how to create Android Widgets. For this, I recommend you the Android SDK or Google. This post is on how to create a simple app that lets the user add and remove widgets, like the Android Home Screen does.
I decided to write this one because I couldn’t find anything on the web saying how to do this. I found how to create this example looking at the Android Home Screen Source Code (AHSSC). So, if you already did this, you may find some variable names similar. You can use this as trails to look yourself on the AHSSC ツ
Initialization
You start by creating two objects. The first is an AppWidgetManager, which will give you the data you need about installed widgets. The second one is an AppWidgetHost, which will keep in memory your widget instances. Latter, your app will handle only the view that will draw the widget:
mAppWidgetManager = AppWidgetManager.getInstance(this);
mAppWidgetHost = new AppWidgetHost(this, R.id.APPWIDGET_HOST_ID);
Selecting the Widget
You start by asking to the AppWidgetHost to allocate resources for a widget instance. It will return an ID for that. Then, you need to start an activity to let the user select which widget he wants to add to your app. You need to give this ID to the activity.
void selectWidget() {
    int appWidgetId = this.mAppWidgetHost.allocateAppWidgetId();
    Intent pickIntent = new Intent(AppWidgetManager.ACTION_APPWIDGET_PICK);
    pickIntent.putExtra(AppWidgetManager.EXTRA_APPWIDGET_ID, appWidgetId);
    addEmptyData(pickIntent);
    startActivityForResult(pickIntent, R.id.REQUEST_PICK_APPWIDGET);
}
void addEmptyData(Intent pickIntent) {
    ArrayList customInfo = new ArrayList();
    pickIntent.putParcelableArrayListExtra(AppWidgetManager.EXTRA_CUSTOM_INFO, customInfo);
    ArrayList customExtras = new ArrayList();
    pickIntent.putParcelableArrayListExtra(AppWidgetManager.EXTRA_CUSTOM_EXTRAS, customExtras);
};
Unfortunately, any kind of software has bugs, and here is one of the Android SDK. The Widget API supports that you merge custom widgets of your application with the installed ones. But if you don’t add anything, the Activity that shows the list of widgets to the user crashes with a NullPointerException. The addEmptyData() method above adds some dummy data to avoid this bug. More on this bug here. If you want to add a custom widget, start looking at this point of the AHSSC.
Configuring the Widget
If the user successfully selects a widget from the list (he didn’t pressed “back”), it will return an OK to you as an activity result. The data for this result contains the widget ID. Use it to retrieve the AppWidgetProviderInfo to check if the widget requires any configuration (some widgets does need). If it requires, you need to launch the activity to configure the widget. If not, jump to the next step.
@Override
protected void onActivityResult(int requestCode, int resultCode, Intent data) {
    if (resultCode == RESULT_OK ) {
        if (requestCode == REQUEST_PICK_APPWIDGET) {
            configureWidget(data);
        }
        else if (requestCode == REQUEST_CREATE_APPWIDGET) {
            createWidget(data);
        }
    }
    else if (resultCode == RESULT_CANCELED && data != null) {
        int appWidgetId = data.getIntExtra(AppWidgetManager.EXTRA_APPWIDGET_ID, -1);
        if (appWidgetId != -1) {
            mAppWidgetHost.deleteAppWidgetId(appWidgetId);
        }
    }
}

private void configureWidget(Intent data) {
    Bundle extras = data.getExtras();
    int appWidgetId = extras.getInt(AppWidgetManager.EXTRA_APPWIDGET_ID, -1);
    AppWidgetProviderInfo appWidgetInfo = mAppWidgetManager.getAppWidgetInfo(appWidgetId);
    if (appWidgetInfo.configure != null) {
        Intent intent = new Intent(AppWidgetManager.ACTION_APPWIDGET_CONFIGURE);
        intent.setComponent(appWidgetInfo.configure);
        intent.putExtra(AppWidgetManager.EXTRA_APPWIDGET_ID, appWidgetId);
        startActivityForResult(intent, REQUEST_CREATE_APPWIDGET);
    } else {
        createWidget(data);
    }
}
Creating and Adding it to Your Views
Now is time to create the widget itself. You will use the Widget ID and the AppWidgetProviderInfo to ask to the AppWidgetHost “could you please create a view of this widget for me?“. It will return an AppWidgetHostView which is a derived class from View. This one you can handle as any other view from the Framework. But don’t forget to set the Widget ID and Widget Info on the view (I don’t know why the AppWidgetHost didn’t when creating the view).
The widget is now working, but is not being updated by your app. If the widget is a clock, it will be stuck at the time you added it. To register the widget to receive the events it needs, call startListening() on the AppWidgetHost. To avoid wasting battery with unnecessary updates while your app is not visible, call it during the onStart() method of your activity, and call stopListening() during the onStop() method.
The widget should be working now. But if you want to remove the widget, you need to ask to the AppWidgetHost to release it. If you do not release it, you’ll get a memory leak (your app will consume unnecessary memory). Finally, remove it from your LayoutView.
public void removeWidget(AppWidgetHostView hostView) {
    mAppWidgetHost.deleteAppWidgetId(hostView.getAppWidgetId());
    layout.removeView(hostView);
}
Note that the widget ID is also deleted during the onActivityResult() method if the user gave up selecting the widget.
Ok, this is just a fast post. I’ve recently added a new Recomendations page. My intention with it is to share some of the feeds from blogs and news that I found to be valuable and have followed for some time. That page should be in constant update. Well, not so “constant”, but from time to time I’ll update it with new content.
Also, I’ve added a list of some blogs from friends. Although these blogs are also in my list of recommendations, I’ve put then on the right side of the blog (instead of the Recomendations page) to enforce how much I recommend then.
And, again, have a happy new year!
PS.: Thank you, @lfzawacki for reminding me to do this. I pushed this task for weeks… ツ
Sometimes you don’t have the resources to invest on the design of your new site. “We’re on the prototyping stage”. “I don’t have money to pay a designer”. If you’re a programmer (like me) and know the very basics of HTML and CSS, you still can easily add some cool effects to your site. This post is just a tip on how can you get some of the effects you see on Twitter.
But please, don’t do this to every site you work on. I like to see different designs on different sites. If all sites start to copy each other’s design, the web will became boring. Invest on the design of your site as soon as possible ツ
The Bootstrap Project
No, you don’t need to hack Twitter to copy the CSS declarations. Twitter itself keeps an open source project called Bootstrap, with some of the layouts used in the Twitter site: buttons, tabs, grids and most effects you see there. It is very simple to use in a simple website. Just put the following code on the HEAD section of your HTML, and half of the work is done:
Something that was new for me until a few weeks ago is that there are some very common dimensions used in very different sites. The usually called the “grid system” is just a convention to use a big column 960 pixel wide, divided in 16 columns of 40 pixels, with 20 pixels of space between them. You combine how many columns you want to distribute your page content and it probably will have a good look. Bootstrap has one implementation of the grid system. If you want to use only the grid system I recommend you to use the 960 Grid, as it is smaller than the whole Bootstrap.
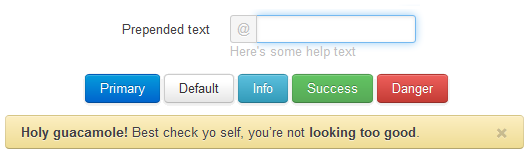
Pretty Input
Another cool thing on Bootstrap is the gloom effect on input fields. Let’s see it:
And how you add this effect? You already did when declaring the use of Bootstrap. But you can customize it by just adding a class to the input field:
Missing code here during a blog migration
There is also a fork of the project on GitHub, adding a few more options to personalize the input fields. You may want to give a look.
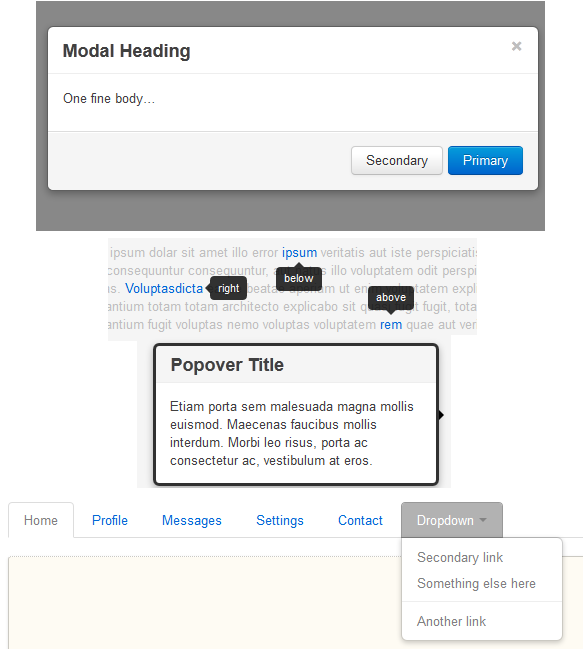
Improving Usability
Bootstrap also gives some JavaScript codes that can help you add some common behaviors in web pages these days. It is based on JQuery plugins, so if you already know JQuery, you will have no trouble with it.
Well, this is just a cool project that I’ve found, and I thought it was veeeery interesting. I believe you too. I could develop some demo, but the Bootstrap page itself is very complete and self-explanatory, so I just took some images to illustrate what Bootstrap is capable of. But if you know other projects such as this one, please leave a comment.
UPDATE: recently, I discovered a similar project called Fbootstrapp, which can be used to develop Facebook apps with the Facebook look-and-feel.
 LinkedIn
 Facebook
 Twitter
 Feeds
Feeds